Not Just a Hose Job: The Right Way to Cool Dogs and Horses in Hot Weather
Some myths are hard to kill. Every summer, they resurface, usually in Facebook threads with 150 comments and rising tension.
“Never hose a horse’s back!”
“Don’t pour water on dogs; it traps the heat!”
You’ve probably seen it. Maybe even argued it. So let’s cut through the noise and get down to what actually works, what doesn’t, and when the stakes are high enough to call the vet.
First: Heat Kills, Fast
Hyperthermia isn’t a vague risk. It’s a medical emergency. In dogs, a body temperature above 39.5°C (103.1°F) is considered abnormal, and above 41°C (105.8°F) is classified as heatstroke, with a high risk of organ damage, coagulopathies, and CNS dysfunction (1)(2).
Horses follow a similar pattern. Heatstroke is generally diagnosed when body temperatures exceed 41.5°C (106.7°F), with neurological signs and cellular injury likely to follow soon after (3).
So no, this isn’t just about comfort.
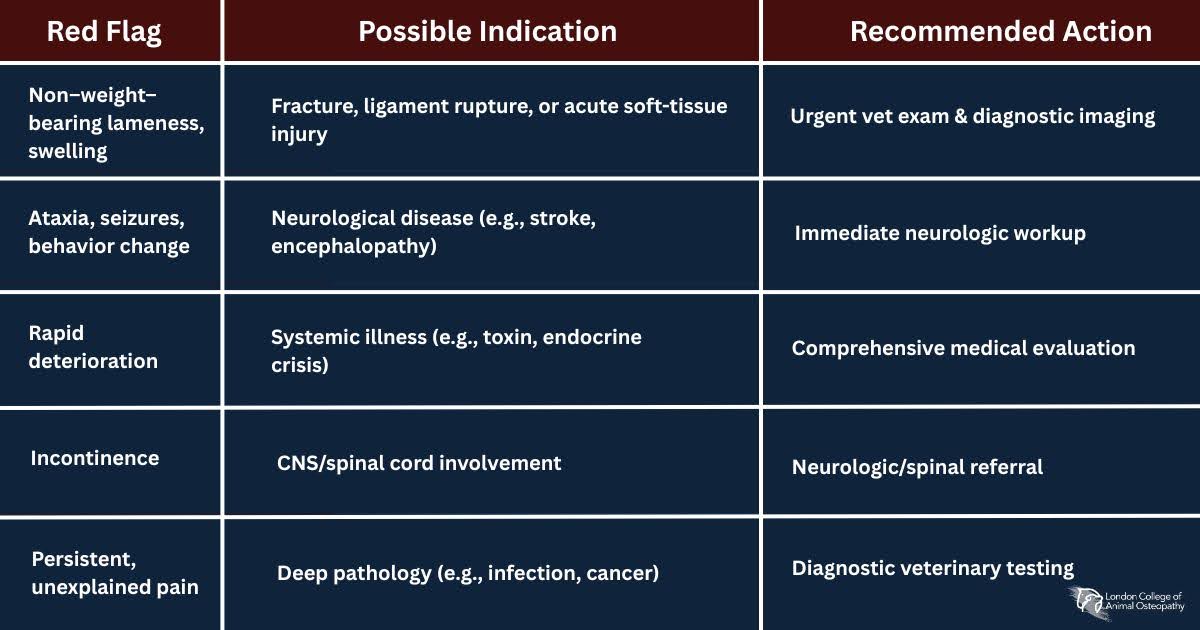
Signs You’re in Trouble
Whether it’s a dog or a horse, these are red flags:
- Rapid, shallow breathing
- Bright red (or very pale) gums
- Weakness, wobbliness, or collapse
- Vomiting (dogs), diarrhea (sometimes bloody)
- Seizures or confusion
- No longer sweating (in horses) despite high effort
- Red gums/tongue (dogs & cats)
- Panting (dogs & cats)
- Drooling (dogs & cats) (9)
- Collapse
If you’re seeing these? This is not the time to “let them rest in the shade” and reassess later. Call a vet immediately. Start cooling while you wait.
Cool Fast, Cool Properly
Let’s talk methods. Because yes, how you cool matters, but probably not in the way you’ve heard.
Horses: The Continuous Cold Water Debate
Here’s the short version: hosing is good. Repeated hosing with cold water is better. Scraping? Optional. And no, cold water doesn’t cause shock.
A number of studies have confirmed what we now know works: cold water applied continuously and repeatedly is one of the most effective ways to lower core body temperature in horses after exercise in hot conditions (4)(8). And no, you don’t have to avoid the large muscles or scrape between rounds. In fact, scraping actually slows the cooling process.
What to do:
- Move the horse into the shade
- Hose cold water over the entire body
- Repeat continuously until rectal temp drops below 38.5°C
- Use fans if you have them
Stop scraping. It’s not doing what you think it is. Scraping was useful when water was scarce or hot; today, it just slows you down.
Dogs: Water Is Not the Enemy
The claim that water “traps heat” on dogs? It’s a misinterpretation of evaporative cooling. Sure, if you pour water on and leave it without airflow, it won’t help much. But if you’re using cold water and creating airflow (with a fan, breeze, or toweling), it’s effective (5).
What to do:
- Get them into shade or air con
- Soak with cool water: belly, armpits, paws
- Use a fan or breeze to promote evaporation
- Offer water to drink (but don’t force it)
- If temp >40°C (104°F), get to a vet now
- Cool water immersion if the dog is otherwise young and healthy (9)
- Hosing with cool water (ensure it is running cool before applying)
Don’t wrap them in wet towels. That insulates heat unless you repeatedly change them. Other methods, such as those listed above, are more effective. And don’t wait for panting to “settle”; panting alone doesn’t cool enough in high humidity. If in any doubt, call your vet immediately as further intervention may be necessary.
Common Myths (And Why They Stick Around)
Some of these beliefs have been around for decades. Let’s unpack a few:
“Cold water causes shock.”
This comes from confusion with immersion shock in humans. Animals don’t respond the same way. Gradual cooling doesn’t increase the risk of shock; it reduces the risk of organ damage.
“Scraping water is essential.”
Only if you’ve got gallons of hot water and no breeze, otherwise, keep spraying (4).
“Cooling must be slow.”
Nope. Rapid cooling saves lives. Delays kill (1)(4).
Other Factors That Raise Risk
Even well-cared-for animals can overheat. But some are more at risk:
- Brachycephalic breeds (Pugs, Frenchies, Bulldogs)
- Horses with anhidrosis (poor/no sweating)
- Obese or heavily muscled animals
- Thick-coated breeds in humid weather
- Older or chronically ill animals
And don’t forget: if they’ve overheated once, they’re more vulnerable next time. Heatstroke causes cumulative damage.
Final Thoughts: Don’t Wait to Be Sure
By the time you’re sure it’s heatstroke, you’re probably already late. When in doubt, cool and call. You won’t regret being wrong, but you will regret being too late.
Resources
1. VCA Animal Hospitals. Heat Stroke in Dogs. https://vcahospitals.com/know-your-pet/heat-stroke-in-dogs
2. Pathophysiology of heatstroke in dogs – revisited. PMC, 2018. https://www.ncbi.nlm.nih.gov/pmc/articles/PMC5800390/
3. Marlin, D.J., & Nankervis, K. (2002). Equine Exercise Physiology. Wiley-Blackwell. Summarised in: AAEP Guidelines on Heat Stress: https://aaep.org/horsehealth/heat-stress-horses
4. Marlin, D.J., Scott, C.M., Roberts, C.A., Casas, I., Holah, G., & Schroter, R.C. (1998). Post exercise cooling strategies in hot, humid conditions. Equine Veterinary Journal, 30(S27), 337–340. https://doi.org/10.1111/j.2042-3306.1998.tb04426.x
5. ACVIM / VETgirl. How to Treat Heatstroke in Dogs. VetGirl Veterinary Continuing Education blog. “Heatstroke is defined as a non‑pyrogenic elevation in core body temperature greater than 105.8 °F (41 °C) along with central nervous system dysfunction.” https://vetgirlontherun.com/how-to-treat-heastroke-in-dogs-vetgirl-veterinary-continuing-education-blog/
6. Veterinary Voices UK. Cool, Icy, Cold or Tepid? What’s Best for Heat Stroke? Myth‑Busting blog post, June 26, 2024. “Pour, hose or if possible immerse the pet in very cold water… Do not drape in towels and leave them in situ.” https://www.vetvoices.co.uk/post/cool-icy-cold-or-tepid
7. VetCompass UK – Heat-Related Illness in Dogs: Risk Factors and Clinical Signs. https://www.vetcompass.org/media/1312/heat-related-illness-dogs.pdf
8.Vet Times (2022). Don’t be afraid of the hosepipe – cold water won’t cause shock in horses. https://www.vettimes.co.uk/news/dont-be-afraid-of-the-hosepipe-cold-water-wont-cause-shock-in-horses/
9. Royal Veterinary College (RVC). Heatstroke in Dogs and Cats: Fact File. Royal Veterinary College Small Animal Department. “Dogs and cats can suffer from heatstroke, a life-threatening condition where the body temperature increases … organ failure and even death can occur.” https://www.rvc.ac.uk/small‑animal‑vet/teaching‑and‑research/fact‑files/heatstroke‑in‑dogs‑and‑cats